The Kapotasana or pigeon pose benefits the chest and hip areas, while stretching the thighs, hip rotators and flexors, and aligning the pelvis and increasing the pelvic floor circulation.
Health benefits of pigeon pose:
Stretches the hip rotators and the hip flexors, this is one of the best hip opening stretches for tight hip flexors
Stretches the gluteal, thigh and piriformis muscles
Stimulates blood flow to the hip area
Helps to alleviate and prevent sciatica
Helps to alleviate low back pain
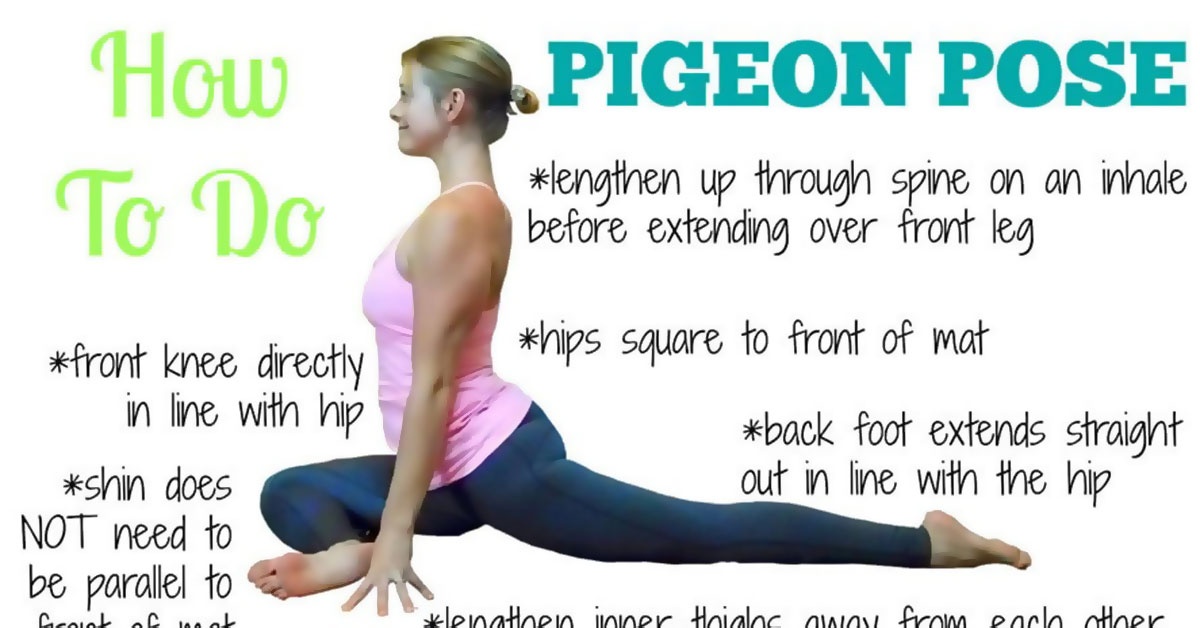
 How to do pigeon pose

Step 1: Start in the table position, with the knees underneath the hips and the arms underneath the shoulders.
Step 2: Cross the left foot over and position it in the front of the right knee. Slide and stretch the right leg straight back. Put a pillow underneath the left hip if the stretch is too strenuous.
Step 3: To align the hips, shift the right side of the chest a little to the left, and then lower the chest onto the left leg. The elbows should be aligned underneath the shoulders.
Step 4: Position the elbows in front of the left knee or lower the body even more If the hip permits, resting the forehead on the mat. Extend the arms on the floor if necessary.
Step 5: Remain in the comfort zone while feeling a good stretch in the left hip.
Step 6: Position both hands underneath the shoulders, and lift the upper body while pressing into the floor, bringing up the chest like a pigeon with a puffed up chest, keeping the shoulders down and away from the ears. No compression in the lower back should be experienced.
Step 7: Come up onto the right knee or shinbone to release. Uncrossing the left leg, straighten it behind you, shaking the foot and leg several times.
Step 8: Repeat on the other side.

Pigeon pose for beginners
- This could be too strenuous of an outer hip stretch for beginners. Put a pillow underneath the left hip in step 2 if the stretch is too great. Be aware of the knees, no pain should be felt in them.
- Make use of a prop to rest your forehead on in step 4 if you are unable to reach the mat with the forehead.
Pigeon pose variations
Reclined pigeon yoga pose
- Step 1: Lift the right leg up at a 90 degree angle,
- Step 2: Lock the fingers of both hands at the back of the thigh.
- Step 3: Cross the right ankle over above the knee of the left thigh.
- Step 4: Gently pull the knee towards the body while pushing the right foot with the left knee on every exhale
- Step 5: Ground down into the floor from the back of the head down to the tailbone.
- Step 6: Repeat on the other side.
Seated pigeon pose
- Step 1: Sit down with the legs extended and the hands by the sides on the floor.
- Step 2: Cross the right ankle over above the knee of the left thigh.
- Step 3: Bend forward and touch the left toe or ankle if unable to touch the toe
- Step 4: Maintain this position for 10 – 20 seconds.
- Step 7: Repeat on the other side.
